Castle Rock Hardwood Floor Water Damage
Raised seams can reveal water that has traveled beneath the finish. Castle Rock hardwood restoration compares the boards with the supporting floor, using measurements and material condition to decide what can dry and what needs removal.
(888) 532-8620Discuss the floor's changing seams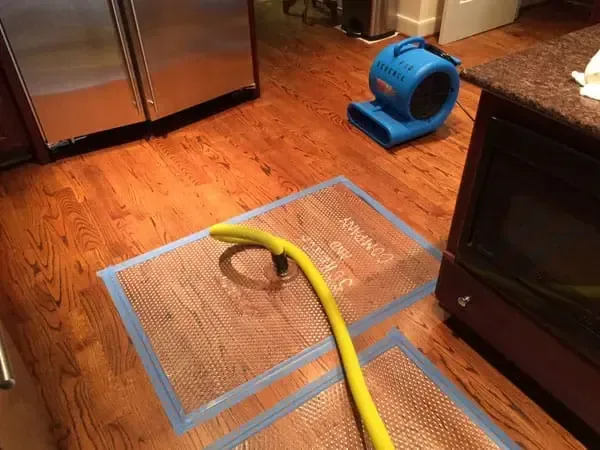
How hardwood floor water damage is handled
A wood floor is an assembly, not just the surface underfoot. Water can affect boards, backing and the layer beneath them differently, so drying and repair choices need to account for how that particular floor is installed.
Rapid local response
The response team prioritizes active water and asks about safe entry, continuing flow and occupied rooms. A clear description helps the assessment focus on hazards before equipment reaches the wet area.
IICRC S500 drying standard
The drying crew sets material goals against unaffected references, sizes dehumidification to the evaporation load and adjusts airflow as readings change. A dry surface alone never closes the moisture record.
Claim-ready documentation
The mitigation team records the source, affected materials, photographs and daily readings in a room-by-room scope. The insurer reviews that evidence against the policy and makes the coverage decision.
Local water experts
The technician distinguishes plumbing discharge from outside water at the actual building. Different floor assemblies, access restrictions and contents call for different drying methods, even when neighboring rooms share the same leak.
First steps for hardwood floor water damage
- Document changing board edges
Photograph cupping, lifting and separated seams safely. Their location traces the moisture path and records the floor before furniture movement or selective removal changes its appearance.
- Control the source and pooling
Stop the release appropriately and recover standing water safely. Leave wet boards uncovered so rugs or other belongings do not obstruct inspection of the affected flooring.
- Identify the installed assembly
Flooring records can describe board type and attachment. Inspection still needs to establish the condition of the actual boards, transitions and supporting layers contacted by water.
- Postpone sanding and replacement
Repairs should follow moisture checks and flooring assessment. Premature work can conceal a damp substrate or address board movement that continues while the assembly dries.
What does hardwood floor water damage cost in Castle Rock, CO?
Hardwood water damage costs in Castle Rock depend on the affected boards, supporting moisture and access for drying. Several rooms or damaged layers needing removal create a different restoration scope from a limited accessible wet section.
Limited accessible wet boards
$1,000 to $2,200
- Defined board area
- Reachable moisture checks
- Focused drying arrangement
Room floor and substrate
$2,200 to $5,500
- Supporting layer assessment
- Broader floor coverage
- Installation specific decisions
Several rooms or removal needs
$5,500 to $9,500+
- Connected wet flooring
- Selective material removal
- Complex restoration boundary
Category, wet square footage, material class and the delay before drying change the scope. The water damage cost calculator gives an estimate only; the inspection establishes the work.
Documentation for your insurance claim
The restoration team assembles timestamped photographs, a moisture map, daily psychrometric logs and a room-by-room scope. Sudden accidental water damage, long-term leakage and outside flooding can receive different treatment. The property owner checks the policy with the insurer; documentation supports review without promising payment for mitigation, access or plumbing repair.
The hardwood floor water damage process
Connect board changes with moisture
Inspection compares cupping and separation with source history. The installed board type and supporting layers identify useful measurement points and help determine practical drying choices for the affected room.
Expose the supporting assembly appropriately
Accessible liquid is recovered before edges and transitions receive closer inspection. Damaged sections may require removal when the supporting layer cannot be reached or treated effectively beneath the existing boards.
Measure response above and below
Readings track boards alongside the substrate rather than only surface appearance. Equipment and access adjustments follow those results, focusing attention where hidden dampness persists despite improvement across the visible floor.
Plan repairs from the measured condition
Records identify retained boards, removed sections and final moisture findings. A flooring professional can assess repair options with that information and the installation requirements before refinishing or replacement work begins.
Inside the hardwood floor water damage assessment
A wet hardwood floor may show raised edges, separated joints or a change near a doorway before the full moisture boundary is clear. In Castle Rock, assessment should identify the installed flooring and its supporting layers before deciding on repair. The wood surface, the way it is attached and the material beneath it all affect what drying can reach.
Inspect the floor shape and the water path together
Cupped boards need an assessment of moisture, attachment and supporting layers before a repair is selected. Moisture measurements help relate the visible movement to conditions within and beneath the flooring. The inspection also follows the source route, checking transitions and edges where water may have traveled outside the area that first looked wet.
- Record raised joints and loose sections before moving furniture or applying a temporary floor covering.
- Check adjoining thresholds that may conceal water beneath a different finish in the next room.
- Identify the installed board type and attachment method before selecting a drying approach.
- Inspect accessible supporting layers when a surface reading leaves questions about moisture below the wood.
For a property in The Meadows, the flooring must be evaluated as installed. Inspection of the boards, adhesive and supporting floor establishes how the installed materials respond to the proposed restoration method.
Give the supporting layer as much attention as the boards
Drying at the top can leave a different condition below. Moisture trapped at an underlayer or against a covered substrate may need access that surface airflow cannot provide. Selective removal can become appropriate when damage or the installation prevents effective treatment of the assembly. That decision should be explained using the affected materials and available measurements.
- Evaluate lifted or separated areas for damage that drying alone cannot reverse.
- Check beneath accessible edges before deciding the entire floor can remain in place.
- Consider whether water condition requires removal of affected layers for proper cleaning.
- Keep an inspection record linking the visible movement with readings in the supporting assembly.
Homes near Elbert Street and Founders Parkway can describe the room and flooring transition when arranging assessment. Photos of changing seams provide a starting point, while measurements establish the wet boundary.
Raised seams and damp thresholds are useful clues, but the supporting floor also needs attention. Describe the source, board changes and adjoining finishes to discuss an assessment that reaches the whole affected assembly.
(888) 532-8620Check wet boards and supporting layersDelay finish decisions until moisture conditions are understood
Early sanding can complicate a floor that is still changing shape as it dries. A flooring professional should check repair options alongside the restoration record and the requirements of any replacement product. Structural drying supports that handoff by documenting the condition of retained materials rather than relying only on the floor's appearance.
- Track the boards and supporting surface at useful comparison locations during the drying period.
- Discuss finish repairs after the source has been controlled and material conditions have been checked.
- Keep removed sections and replacement boundaries clear when only part of the floor requires reconstruction.
The final decision may involve retaining, selectively replacing or removing flooring according to its condition. A measured assessment gives the owner a clearer basis for that choice than a promise made from the first photograph.
Safe access comes first
The response team assesses electrical contact, unstable ceilings and contaminated water before extraction begins. Occupants keep clear of affected rooms until the hazards have been checked. A plumber isolates an active supply failure; drying follows source control and inspection of the materials beneath the visible damage.
Property owners can review flood safety precautions and EPA indoor air information alongside the onsite assessment.
Hardwood floor water damage in Castle Rock
Hardwood assessments in Castle Rock can be arranged using The Meadows, Elbert Street or Founders Parkway as local references. The room layout, board changes and source of the spill are the details that establish the inspection area inside the property.
The same service nearby: hardwood floor water damage in Monument, Castle Pines, Parker.
Related water damage services in Castle Rock
Hardwood Floor Water Damage questions in Castle Rock, CO
Discuss the wet materials
Raised seams and damp thresholds are useful clues, but the supporting floor also needs attention. Describe the source, board changes and adjoining finishes to discuss an assessment that reaches the whole affected assembly.
(888) 532-8620Check wet boards and supporting layersDoes cupping mean the entire wood floor must be replaced?
Cupping indicates a shape change that needs assessment, but the final decision depends on material condition and moisture within the assembly. Measurements, installation details and damage at joints help determine whether retention, selective replacement or broader removal is appropriate for the affected floor.
Why measure the subfloor as well as the boards?
The supporting layer may retain water after the exposed surface improves. That difference can affect continued movement and future flooring work. Checking both layers gives a more useful picture of the assembly before a contractor considers refinishing or covering the repaired area.
Can sanding begin while the boards are still drying?
A floor can continue changing shape as its moisture condition changes. Sanding too early may address a temporary condition rather than the stabilized surface. Repair timing should be checked with the flooring professional after the source and material moisture have been assessed.
Will drying mats suit every hardwood installation?
The appropriate method depends on the floor type, attachment and access to retained moisture. Some installations or damaged layers may need a different approach or selective removal. Equipment selection should follow assessment of the actual assembly and its response during the work.
What if water crossed into another flooring type?
The transition should be inspected on both sides because water may travel beneath the adjoining finish. Each material has its own handling and drying considerations. The restoration boundary follows the water path rather than stopping where the hardwood boards end at the doorway.
Should the damaged area be covered with a rug?
Covering can conceal moisture changes and interfere with inspection or drying at the surface. Keep affected areas available for assessment while maintaining safe access around lifted boards. Contents and temporary protection should be arranged in coordination with the restoration plan for the room.
Make the flooring decision after moisture check
Recorded conditions help connect drying results with practical repair choices for the boards and the surface beneath them.
(888) 532-8620Plan the hardwood moisture assessment